


Need some help? We are here for you!We have a very friendly service - Come and chat to us and let us know what you need, we work for an hourly fee and can also provide you a no obligation quote and begin work immediately in most cases. Click "Request Support" or use our Live Chat.
Request support
WordPress websites are very easy for people to maintain themselves even with very little technological knowledge or know-how. In this Knowledge base article we’re going to walk you through the steps of creating and editing pages and content on your WordPress website. This article assumes you already know how to login to your WordPress admin area.
OK First things first, One you login to your admin panel, you will be presented with what appears to be an overwhelming number of menus and options, not to worry though as today we’re just going to be concentrating on the ‘Pages’ menu option.
Step 1: Creating a new page, or editing an existing one
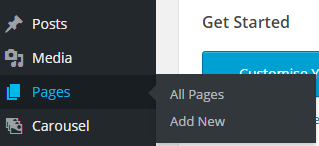 If you hover over the Pages menu item you can then either decide if you’re going to be creating another page, or if you will in fact be editing an existing page on the website. Obviously, if you’re adding a new page then click on the ‘Add New’ menu item where you will be take to the page editor. However if you wish to edit an existing page the click ‘All Pages’ in the sub menu.
For now don’t worry about the other options in the menu, we will cover these in future articles. OK, so now you’ve made your choice, what’s next? If you chose ‘Add New’ then please skip to step 3, otherwise, continue reading step 2.
Step 2: Choosing which page to edit
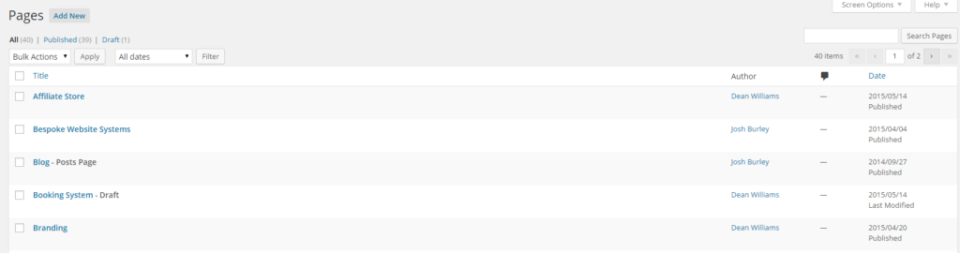
To the left is an image of what you should now be able to see. It is a list of current pages currently on your WordPress website. Even from here you can change your mind and click the add new button at the top.
However, to simply edit one of these pages, all you need to do is click on the page name seen here in blue. This will instantly take you to the page editor which we will now discuss in step 3.
Step 3: Page content
Whether you’re adding a new page or editing an existing one, this step is exactly the same, just the obvious difference that when its a new page it will obviously start out completely blank.
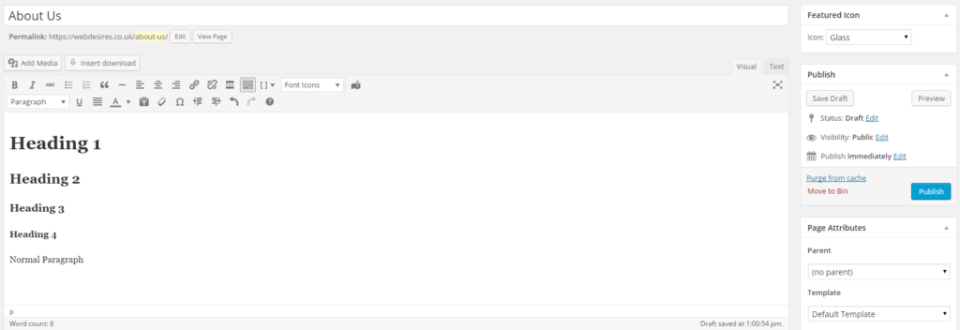
Right at the top is the page title, whatever you enter here will be seen at the top of any content you write. This title will also help WordPress generate the URL for you’re newly created webpage, if this is not exactly how you wanted the URL to be, then it is easily editable using the ‘Edit’ button just to the right hand side of the generated URL.
Once you have decided on your page title or edited the existing one, its now time to add or edit the content on the page. You can clearly see there is a WYSIWYG (What You See Is What You Get) editor built into this page. Similar to good old Microsoft Word, the editor allows you to customise the content on the page however you wish. For being a little more creative, there is also an option where you can include media, perfect for adding visuals and images into your page content. The button for this can be found right above the WYSIWYG editor and below the page title. The ‘Add Media’ button allows you to upload images to your WordPress site storage an reuse them on any other pages. Or you can use an image that’s already uploaded. But we will go into this in more detail in a another post.
OK, for content editing there’s a lot more we can discuss, but my advice now is to go ahead, experiment with the options and try to learn more about the system by doing so. But finally there is the small matter of the menu on the right hand side, here you can save your page as a draft, publish, view revisions, set parent pages or even change the layout template of the page.
Thats it, you’re now ready to add and edit page content on your website. Goodluck!
Need some help? We are here for you!We have a very friendly service - Come and chat to us and let us know what you need, we work for an hourly fee and can also provide you a no obligation quote and begin work immediately in most cases. Click "Request Support" or use our Live Chat.
Request support


